Category Archives: ACA

circle stitching

well, I was trying a knit-a-year project but since I don’t have much yarn here (on overseas trips) and have been more interested in stitching and embroidery lately, I’ve decided to shift to a stitch-a-day project instead. I might use my other blog for another project so will relocate the articles here (or add to the previous post).

my first attempt – I’ve been totally inspired by the work of Junko Oki and since attempting to stitch circles in a modified blanket stitch, I can see more clearly just how fine and free her beautiful stitching is. mine feels large and clumsy in comparison, so I will need to practice more to create smaller stitches. also, I need to bring more fabric to use as a background as on this trip I only have some calico, and a couple of coloured threads.

there’s lots of circles & other textures in the hotel room. the carpet has concentric circles – a bit like the Maori koru shape. I like the red crushed velvet lounge chair in the room too – it has some nice lines and shapes in the shadows


06/10 update:
I stitched some more circles and other shapes this weekend

Junko Oki – stitching circles

tonight I’ve been taking a look at embroidery by Junko Oki – she has some beautiful pieces. I love her use of circles and lines.

I emailed her to order a copy of her new book, “Culte a la Carte” (I think her first book has sold out), and mentioned I was doing a textiles course and had been enjoying embroidery. I asked if hers was all stitched by hand or mixed with machine embroidery too. she responded,

“I’m glad to you interested in my work.
My work is stitched by hand all.
I do not have that you have to study about embroidery .
I have the feeling produced in like writing a picture.”

the circles are intricate rows of fine blanket stitch, with lines in running stitch and some feather stitch. lots of “sun” themes. I’m really loving it. the imperfections and textures created by the stitching mixed with the choice of textures and colours of the fabrics as the backgrounds. I’m looking forward to the book arriving so I can see more of her work.

I love some of the backside stitches, ie via February 2012:


from Dee’s Hall from October 2012 – a lovely portrait of a woman’s profile.

& a closeup of the spheres from April 2013

I love this one, with the stripey, business shirt or crisp new bed linen / sheets type pleats, darts, gathers & smocking to create movement and shape in 3D, and how the stitched parts of the fabric are chaotic and textured with layers of white and black threads, and complemented with the reddish-brown layer – they draw the eye in and let you explore the stitches as well as the joins of the different fabrics, and edges of the fabric. I love the ripped / torn edges on the lower part of the piece. there’s a range of sewing techniques shown around the edges of the stitching, and decorated & highlighted by the stitches. the top of the photo shows order and crispness with a starch ironed feel which reminds me of work / business shirts, whilst the bottom of the photo shows more flowing, free & lighter fabrics for holidays and home wear. to me it feels like it’s a mix of the fabrics of a life, and the phases of our lives.

rainy today from october 2012 also.

classwork whilst away

I’ve been away from my class materials since working on this new work project. which means I haven’t had as much fabric, paints, threads, the sewing machine etc to work with. I found an app called art set on the itunes app store and tried it out on the flight home last week. it’s pretty good. it has a large range of colours, and background “paper” with different textures and colours and weights – actually more than I have at home. plus multiple pens, pencils, felt pens, paints, crayons, sponges, erasers, water for smudging edges, and the app is really easy to use. it’s not the same as using the materials by hand of course, but I think it does replicate the styles / effects the materials have quite well. and it was only 99cents. wish I’d known about this prior to spending a couple of hundred dollars on a much smaller range of pens and paints! I tried a few simple mark making exercises, then I took a photo from the front airplane camera (was my first time on an A380 & it has camera views on the tv/entertainment system – a view from the front of the plane, below near the wings, and looking towards the tail of the plane) and made a drawing of the view.

SonUmbra & Solar Harvesting Textiles

this week I’m away from home, and have been sick. it’s thursday and the first day my head’s felt clear in ages. after a week of early night’s sleep with nighttime cold’n’flu tablets I’m finally catching up on some class work.

tonight I came across these projects:

  • loop.pH design studio’s project “SonUmbra” – experiments in responsive textile architecture.
    “SonUmbra is a solar-powered tree composed of strands of light-emitting fabric woven into a lucent web of branches. The installation’s canopy of photovoltaic panels captures light during the day, and once the sun sets the tree blooms in an interactive flourish of light and sound.”
    this looks great – it seems like they’re using fibre obtic cables? I have to research this some more. their photos on flickr show some of the projects and installation.
    image via C-Monster<> at www.flickr.com/photos/23835356@N00/2297218390
  • Solar Harvesting Textiles – a project by Sheila Kennedy that I came across via this article on their Soft House. according to the article, Kennedy hopes that “textiles will soon be able to take the sun’s energy and turn it into electricity”. . . .”The Soft House is a structure that can create close to 16,000 watt-hours of electricity by transforming household curtains into flexible, semi-transparent, solar collectors.”. whilst this system is too expensive to use practically now, with Moore’s Law it won’t be long before these sort of fabrics will be in regular use.
    image via http://assets.inhabitat.com/wp-content/blogs.dir/1/files/softpv2.jpg & soft house article on Inhabitat site

Assignment 2

project 3: colour

stage 1 – Introduction and preparation

stage 2 – colour perception


exercise 1


exercise 2

stage 3 – recording colours accurately


exercise 1


exercise 2


exercise 3


exercise 4

stage 4 – colour moods and themes


exercise 1


exercise 2

stage 5 – coloured stitches

stage 6 – combining textures and colour effects — exercise 1 and exercise 2

sketchbook

research point

project 4 – developing design ideas

stage 1 – Introduction and preparation

stage 2 – looking for shapes and drawings

– introduction

exercise 1

exercise 2

exercise 3

exercise 4

stage 3 – selecting from your drawings and stage 4 – developing design ideas

(combined)

experiments with printing and painting

(project 4z)

stage 1 – preparation

stage 2 – experimenting with techniques

project 5 – painting and printing

stage 1 – reviewing your fabric collection

stage 2 – selecting your design ideas

stage 3 – printing and painting onto fabric

stage 4 – a larger sample

assignment 2 review

assignment 2 prep

prep for assignment 2 / part 2: building a visual vocabulary
these notes are mostly to list which materials & techniques will be used in the exercises, so I know what to prepare for

project 3: colour

materials

  • sketchbook & A3 paper
  • coloured pencils, paints, brushes, jam jars. paints (gouache): alizarin crimson, cadmium red, cadmium yellow, lemon yellow, ultramarine, cerulean blue
  • collection of coloured paper, sticky paper, origami paper
  • fabrics and yarns from stash
  • small sheet of sugar paper – mid-grey paper
  • brightly coloured patterned fabric (8cm x 8cm)
  • transparent folder or bag
  • collection of small coloured objects or fruit & veges such as an orange, apple or lemon
  • water-soluable fabric (for machine embroidery)

    stage 1 – Introduction and preparation

  • painting colour wheels

    stage 2 – colour perception

    exercise 1

  • painting/coloured paper squares with another colour square in the centre

    exercise 2

  • painting/coloured paper squares with grey square in the centre

    exercise 3

  • record (paint) the colours in a postcard of a painting, image

    exercise 4

  • record (paint) the colours in an object, or a few objects close together eg fruit, shells, leaves, jewellery etc

    stage 4 – colour moods and themes

    exercise 1

  • paints & sketchbook – use these 2 pairs of opposite words & find colours which express them

    exercise 2

  • colour mood or theme – make colour bags with small fragments of fabric, yarns & coloured papers

    stage 5 – coloured stitches

  • on black background fabric, repeat stage 2 project 2 but with stitches

    stage 6 – combining textures and colour effects

    exercise 1

  • hand embroidery

    exercise 2

  • hand embroidery

    sketchbook

  • fabric paints, fabric crayons or paintsticks and dyes
  • work in sketchbook for min 10 mins each day

    research point

  • look at a textile piece you have at home – look at it, sketch it, reflect on it

    project 4 – developing your ideas

    materials

  • A3 paper
  • paints, coloured pencils, crayons, brushes, jam jar, ruler
  • a collection of small coloured objects to draw (stones, shells, fruit, Christmas decorations etc)
  • sketchbook & resource materials (postcards, photos etc)
  • photocopier, scanner or tracing paper

    stage 1 – Introduction and preparation

  • drawing, cutting out paper squares and shapes

    stage 2 – looking for shapes and drawings

  • images from resource materials
  • drawing

    exercise 1

  • drawings

    exercise 2

  • drawings

    exercise 3

  • drawings with mixed media – paints, wet & dry media, colllage

    exercise 4

  • drawing from objects

    stage 3 – selecting from your drawings

  • drawings, viewing frame

    stage 4 – developing design ideas

  • drawings
  • scanner or photocopied or tracing paper

    experiments with printing and painting

    materials

  • selection of fabric paints, fabric crayons, Markal paintsticks, inks
  • prepared surface for printing (table or board)
  • cutting mat, hardboard or thick cardboard
  • ink pad
  • paper in different colours, textures including brown paper wrapping paper, newspaper, tissue paper, sugar paper, shiny paper surfaces, hand-made paper
  • block printing and stamping equipment
  • stencil card, acetate, sticky-back plastic or any stiff card
  • masking tape
  • hand painting equipment: household paint brushes, hog’s hair, sable or synthetic brushes, stencil brushes, old toothbrushes, foam brushes
  • palette, plate or small pots for mixing colours
  • squeeze bottle for adding clean water when mixing colours
  • thin rubber gloves
  • sharp craft knife – scalpel or Stanley knife
  • mirrors to look at your design in repeat
  • iron to fix fabric and silk paints
  • baking parchment or cotton cloth
  • small line and pegs to hang up samples
  • waterproof adhesive

    stage 1 – preparation

  • making a printing pad

    stage 2 – experimenting with techniques

  • block printing
  • relief printing
  • stencils
  • masks
  • hand painting
  • silk painting

    project 5 – painting and printing

    materials

  • collection of fabric samples
  • design ideas and experiments from project 4
  • fabric printing and painting equipment
  • dressmakers’ pins
  • hand hairdryer

    stage 1 – reviewing your fabric collection

  • fabric – painting on fabric. test swatches

    stage 2 – selecting your design ideas

  • design ideas and experiments from project 4

    stage 3 – selecting your design ideas

  • hand painting onto fabric
  • printing onto fabric

    stage 4 – a larger sample

  • printing on a larger piece of fabric

    assignment 2

Stitches which create texture

A Creative Approach — Project 2 Developing your marks — Stage 5 — Stitches which create texture

In this exercise I had to work stitches in different directions, initially using the same type of thread, and then introducing other weight threads. I used a single colour thread (or as close as possible) for each sample. Some threads are shiny and thin whilst others are thicker, multi-threaded and matte. when you mix them together you can see the difference in texture each creates, as well as different textures caused by the different amount of light the threads reflect.

I began with satin stitch in red shades, using different stitch lengths and shiny and matte thread. The rows of satin stitch sit nicely next to each other. Some of the threads look softer and others look rougher.

My favourite sample is the thin white triangle peaks. The stitches are fairly close together, thinner at the bottom of the upside down V and there’s a thicker gap at the top. I stitched different number of rows along the rows. I think this makes a nice pattern and it’s something I could use in a project. I’d tried he triangle peaks in thicker orange yarn too but I don’t think it’s as effective — it seems to soften the edges, whereas the thinner white thread is more precise so the lines are more defined and crisper to my eyes.

I also tried a few samples in red and whites for overlapping stitches that crossover each other, and are of different stitch lengths and thread weights.

stage5-01

stage5-02

02/09/2013 — After discovering Junko Oki’s work, I tried a few textured stitches that she uses to create circles, triangles and lines.

(circle-stitching.jpg)
(circles1.JPG)

Preparing to create textures

A Creative Approach — Project 2 Developing your marks — Stage 4 — Preparing to create textures

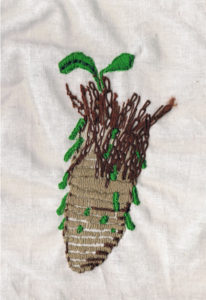
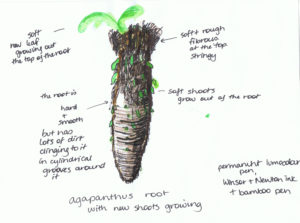
In this exercise I had to look through some of my previous work and think about them in terms of textiles and creating textures. I looked at some of my sketches, but one stood out the most is the Agapanthus root from stage 3, exercise 2 — it’s the ugliest topic and drawing but I think it does show a lot of texture. It’s both rough and shiny, lumpy and distorted, it has hard and soft parts, and chaotic stringy parts.

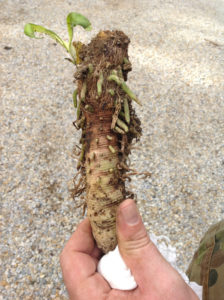
Here’s the drawing and original photo:

project1-stage3-ex2-03

project1-stage3-ex2-07

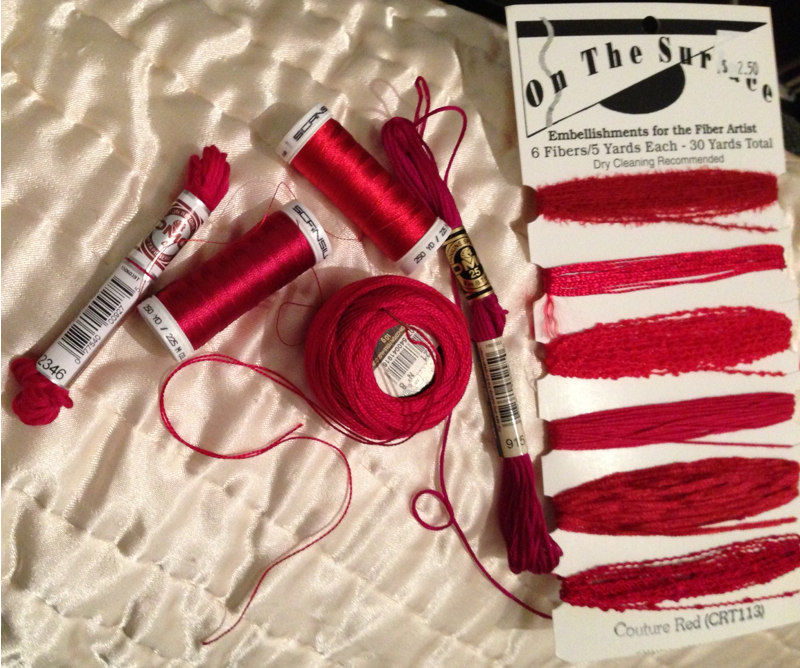
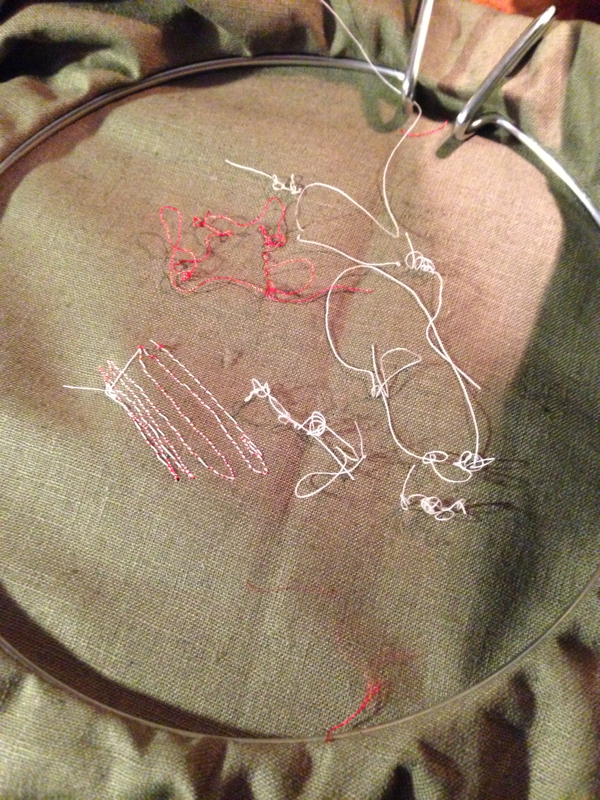
Whilst I started to embroider just a small part of the root, I was swept up by it and wanted to finish it so I embroidered the whole piece instead. I used a mixture of matte and shiny threads, thick and thin. Stitches included running stitch, back stitch, satin stitch, chain stitch, and a couple of crouched stitches. The colours closely match the original (well, as well as I could given the threads I have at home). I used a mixture of short and long stitch lengths and narrow and wider stitch widths to try capture some of the space & shape of the root. It doesn’t look exactly like the original though I think I have managed to capture some of the textures.

I’ve been reading through the book “Hoopla: The Art of Unexpected Embroidery” by Leanne Prain, and there’s a chapter called “A Brief and Incomplete History of Embroidery” which mentions,
“Early embroideries were stitched to tell religious and social histories, and they depicted scenes not only of peaceful domestic life, but also the horrors of conquest.”

Agapanthus plants are a pest in the Australian native bush — they are an introduced plant, and whilst they might be OK for paths and lining highways, they are not meant to be planted in bushland. J tries to remove them as much as possible — he’d pulled this one out of the garden and was showing me how the shoots sprout all over the main root. So, whilst this isn’t a war of invading peoples, it is a smaller scale war with the Agapanthus to try remove them all. Once they flower and the wind spreads their pods and flowers, they spread quickly. So this picture reminds me of the horrors of the Agapanthus conquest of the garden and J’s hard, great work in trying to lessen their damage to the Australian bush.

stage4-01

A Sample

A Creative Approach — Project 2 Developing your marks — Stage 3 — A Sample

For this exercise I chose one of my ink drawings which is mostly line based. I hand stitched in running stitch and stem stitch — in different directions and with a mixture of threads, some shiny, some matte, some thick, some sewing machine rayon so very thin. A couple of the diagonal sections turned out quite textural and layered. They have multiple threads and layers so are quite raised on the surface of the fabric. These probably would suit the following exercises. The stitches are all line based stitches though, so it shows how they can be used to create both line and texture.

stage3-01

Here’s the ink drawing which was used for inspiration. The top two diagonal / horizontal sections are a bit different — I was enjoying seeing the different light on the threads poke through as I stitched, so this is a bit of interpretation rather than accurate portrayal of the original picture.

stage3-02

The range of threads used in my sampler:
scansilk – colour # 1804 100% rayon
scansilk – colour # 1805 100% rayon
DMC #8 colour 321 coton perle
DMC #25 colour 915 mouline special
DMC #4 2346 coton retours mat
On the Surface – the second one on the card – Couture Red (CRT113)

The fabric is olive green linen from my fabric stash (this was my partner’s Mum’s fabric).

stage3-03

freestyle machine embroidery

I can’t get the sewing machine to do freestyle machine embroidery. it seems to sew in the wrong direction – ie sew up the excess thread from the threaded needle and then the thread comes out of the needle. 🙁 I’ve tried holding the threads but still no luck. I’ve tried with a foot on (I think it’s actually a clear buttonhole foot), the foot off, tightening & loosening the screw on the bobbin holder to adjust bobbin tension and the feed dogs down. when I put the feed dogs up again it sews normally (well, as normal as it usually does – see the stitching in this first photo, with white thread plus red bobbin thread). I tried pulling the fabric tauter on the hoop and trying a thicker fabric. I haven’t tried using fusible interfacing on the fabric yet though, so maybe the fabric is too thin? basically it doesn’t seem to pick up the bobbin thread at all either.

freestyle03r


feed dogs down & feed dogs up

freestyle02d

freestyle01u

I tried watching some videos and following their instructions but I’m still not having any luck. I’ve had some problems with it when doing straight stitching too – so possibly it’s the machine’s problem – it skips stitches irregularly when stitching normally (I quite like this in some cases though – it has a nice glitch). but maybe this means it’s not suitable for freestyle machine stitching?

am tempted to try find a bernina 1008 sewing machine – the books I read by Sue Stone mentions she uses one and I like her work and stitches. in technique & stitch vocabulary she says she has two! one for normal stitching and one for machine embroidery. I also like the darning stitch she uses over the top of her layered stitches, she makes it look like hand woven stitches